How to Stream Pre-Recorded Videos Live on YouTube
Let’s be real — not everyone has the time, the energy, or honestly the desire to go live on YouTube in the traditional sense. Maybe you’ve recorded a killer video, edited it perfectly, and now you want to broadcast it as a live event without sitting there the whole time babysitting it. Or maybe you’re running a business and want to stream product demos, tutorials, or event replays on a schedule — automatically — while you focus on other things.
Whatever your reason, streaming pre-recorded videos as live content on YouTube is 100% possible, and more people are doing it than you’d think.
In this guide, we’ll walk you through exactly how it works, what tools you need, and how to make it look completely seamless to your audience.
Why Stream Pre-Recorded Videos as Live Content?
Before jumping into the how, it’s worth understanding why this approach makes a lot of sense — especially for creators and businesses.
Live streams get more visibility. YouTube’s algorithm tends to push live content more aggressively than regular uploads. When you go “live,” subscribers get notified, and your stream appears in a separate dedicated section. This means more eyeballs on the same content.
You control the quality. Actual live streams are unpredictable. Audio glitches, bad lighting, nervous mistakes — they happen. Pre-recorded content that you’ve already edited and polished doesn’t have these problems. You get the reach of live with the quality of a produced video.
Scheduling becomes effortless. Want to air a tutorial every Tuesday at 8 PM without touching your computer? With the right setup, that’s completely achievable.
Viewer engagement still works. People watching your “live” stream can still comment in real time, join the chat, and interact with you if you’re monitoring it. From their perspective, it’s an event — not a replay.
What You’ll Need
Here’s the basic toolkit:
- A YouTube channel with live streaming enabled (you need to verify your account and wait 24 hours if you haven’t done this yet)
- A stream key from YouTube Studio
- Encoding software that can push your pre-recorded video to YouTube as an RTMP stream
- The video file you want to broadcast
The key piece here is the encoder. This is what takes your video file and sends it to YouTube’s servers as if it were a live camera feed. YouTube has no idea the difference — it just receives a video stream.
Method 1: Using OBS Studio (Free, Manual)
OBS (Open Broadcaster Software) is the most popular free tool for this.
Step-by-step:
- Open YouTube Studio → Go to Create → Go Live
- Set up a new scheduled stream, copy your Stream Key
- Open OBS → Go to Settings → Stream → Choose YouTube and paste your stream key
- In OBS, create a new scene, add a Media Source, and select your pre-recorded video file
- Check “Loop” if you want it to repeat, and uncheck “Close file when inactive”
- Hit Start Streaming in OBS when you’re ready
That’s the core of it. OBS will push your video to YouTube as a live stream.
The catch: You have to be at your computer the entire time. OBS doesn’t schedule streams or run unattended. If your video is three hours long, you’re stuck babysitting it — or you leave your PC on and hope nothing crashes.
For a one-off stream, this works fine. But for anything recurring or automated, this gets old fast.
Method 2: Using FFMPEG (Advanced, Terminal-Based)
If you’re comfortable with the command line, FFmpeg can loop and stream a video file directly to YouTube with a single command:
bash
ffmpeg -re -stream_loop -1 -i your-video.mp4 \
  :v libx264 -preset veryfast -maxrate 3000k -bufsize 6000k \
  -pix_fmt yuv420p -g 50 :a aac -b:a 128k -ar 44100 \
  -f flv rtmp://a.rtmp.youtube.com/live2/YOUR_STREAM_KEY
This streams your video on loop indefinitely. You can run this in a screen or tmux session on a VPS so it keeps going even when you close your laptop.
The limitation: Managing this manually — starting it, stopping it, switching videos, handling crashes — requires technical knowledge and constant attention unless you build more tooling around it.
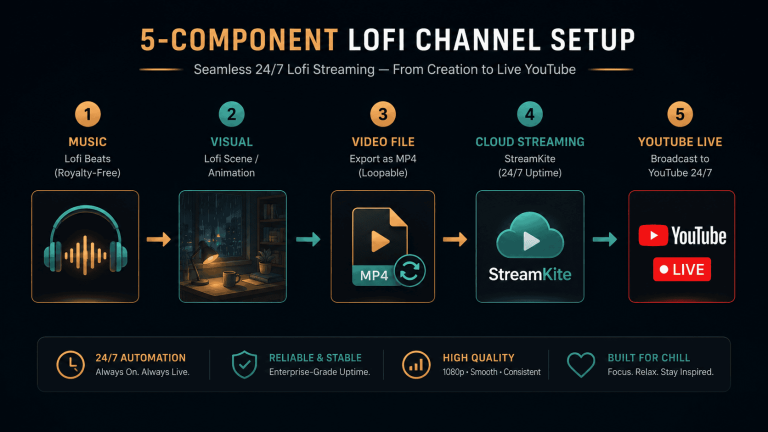
Method 3: Using a 24/7 Streaming Platform (The Smart Way)
This is where things get genuinely useful for creators and businesses who want this to run automatically, reliably, without touching a terminal or leaving a computer on.
Platforms like StreamKite are built specifically for this use case. You upload your pre-recorded videos, set your stream key, and the platform handles everything — encoding, looping, scheduling, and keeping the stream alive 24/7 from their servers.
You’re not using your own bandwidth. You’re not leaving your PC on. The stream just runs.
What makes this approach stand out:
- Playlist support — queue multiple videos to play in sequence, automatically
- Scheduled streaming — set a start time and the platform fires it up for you
- No hardware required — it all happens in the cloud, so your laptop can be off
- Crash recovery — if something hiccups on the streaming side, it restarts automatically
- Multiple platforms — stream the same content to YouTube, Facebook, and other RTMP destinations simultaneously
For someone running a course business, a YouTube channel with consistent upload schedules, or a company that wants to loop promotional content during events — this is the setup that actually scales.
StreamKite uses a PassKey-based system, so there’s no complicated account setup. You get a key, you log in, you configure your streams, and you’re done. It’s built to be genuinely simple even if you’re not technical.
Tips to Make Your Pre-Recorded Stream Feel Live
A common worry is that viewers will figure out it’s not really live. Honestly, most won’t — but here are a few things that help:
Add a live chat overlay or interact during the stream. Even if the video is pre-recorded, you can be in the chat answering questions in real time. Your audience gets the value of both.
Use a relevant thumbnail that says “LIVE.” YouTube auto-shows the live badge, but a strong thumbnail reinforces the event feel.
Don’t start the stream too early. If you schedule it for 7 PM and it starts at 6:45 with a black screen or holding slate, people notice. Most platforms let you do a quick pre-show countdown instead.
Trim your videos tightly before uploading. Dead air at the beginning or end of a pre-recorded stream is a conversion killer. Edit it clean before you push it live.
Mention the date or a current event at the start of the video. This makes it feel timely even if it wasn’t recorded yesterday.
Final Thoughts
Streaming pre-recorded content on YouTube isn’t a hack — it’s a legitimate strategy that hundreds of successful creators and businesses already use. The key is picking the right method based on how often you want to do it and how much of your own time and infrastructure you want to manage.
For casual one-off streams, OBS gets the job done. For anything recurring, automated, or professional-grade, a dedicated 24/7 streaming platform like StreamKite removes the headache entirely and lets you focus on what actually matters: the content itself.
Start small, test your setup before going public, and once you see the engagement lift from live events — you won’t want to go back to regular uploads.
Start your 24/7 loop stream today
Run a nonstop YouTube live stream from any device.
No PC required. No technical knowledge needed.